[Arduino官方機器人教學] HelloUser 輸入使用者名稱,播放圖片音樂與按鈕互動
[開箱照過來] Arduino 官方版機器人平台
HelloUser 官方說明頁面
本 Arduino Official Robot 與相關資源感謝 RS Component 熱情贊助!
 我們將依序介紹 Arduino 官方機器人的各個範例程式碼以及執行的影片。本範例是 HelloUser,請先下載 Arduino 1.0.5 或之後的版本就可以在 Examples / Robot control / explore 中找到 R11_HelloUser 這個範例。直接安裝到 Arduino 官方機器人上層的 Robot Control 板即可執行(下層叫做 Robot Motor Board)。
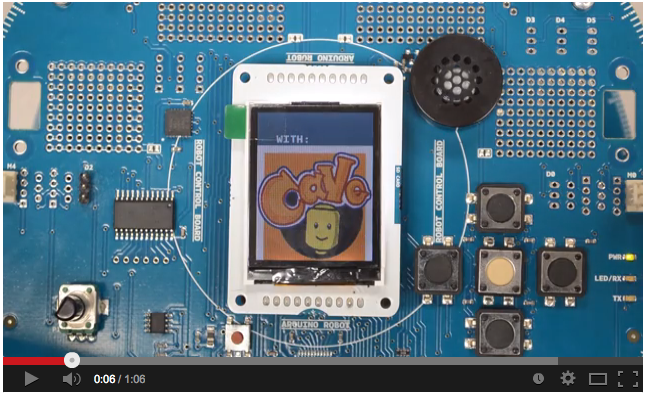
以下是 HelloUser 的程式碼,程式都在setup() 中。您可由影片中看到機器人上的彩色螢幕(好豪華...)載入幾張圖片(圖片都是放在 micro SD卡中),播放音效檔(menu.sqm)。使用SD卡就不用太擔心容量的問題了。
接著機器人會請您使用按鈕輸入名字(本影片為CAVE)之後會顯示一些打招呼語。先來看影片吧
[youtube=http://www.youtube.com/edit?o=U&video_id=jq-zRCIKDBY]
還記得我們有提過 Arduino官方機器人的韓式庫中做好了很多高階方法嗎?以下程式碼中的有一個textManager物件,它的writeScript(),showPicture() 與 input() 方法就是現成的語法可以用。您可以自己定義喜歡的語法加入 library 中就可以啦。
我們有將重要的地方改成中文標記
----------------------------------------------------------------
#include <ArduinoRobot.h>
#include <utility/RobotTextManager.h>
char buffer[20];//用來儲存使用者輸入的名稱
void setup(){
//necessary initialization sequence
Robot.begin();
Robot.beginTFT();
Robot.beginSpeaker(32000);
Robot.beginSD();
//從SD卡中顯示 logo圖檔
Robot.displayLogos();
//播放音樂檔
Robot.playFile("menu.sqm");
// 清除螢幕
Robot.clearScreen();
// 以 script 的概念播放圖檔與文字。之所以稱為 script 是因為這些是一連串儲存於機器人記憶體的文字
//Script 6
textManager.writeScript(5, 4, 0);
textManager.writeScript(9, 10, 0);
Robot.waitContinue();
delay(500);
Robot.clearScreen();
//Script 7
textManager.writeScript(6, 4, 0);
textManager.writeScript(9, 10, 0);
Robot.waitContinue();
delay(500);
Robot.clearScreen();
//Script 8
// this function enables sound and images at once
textManager.showPicture("init2.bmp", 0, 0);
textManager.writeScript(7, 2, 0);
textManager.writeScript(9, 7, 0);
Robot.waitContinue();
delay(500);
Robot.clearScreen();
//Script 9
textManager.showPicture("init3.bmp", 0, 0);
textManager.writeScript(8, 2, 0);
textManager.writeScript(9, 7, 0);
Robot.waitContinue();
delay(500);
Robot.clearScreen();
//Script 11
textManager.writeScript(10, 4, 0);
textManager.writeScript(9, 10, 0);
Robot.waitContinue();
delay(500);
Robot.clearScreen();
//Input screen
textManager.writeScript(0, 1, 1);
textManager.input(3, 1, USERNAME);
textManager.writeScript(1, 5, 1);
textManager.input(7, 1, ROBOTNAME);
delay(1000);
Robot.clearScreen();
//last screen
textManager.showPicture("init4.bmp", 0, 0);
textManager.writeText(1, 2, "Hello");
Robot.userNameRead(buffer);
textManager.writeText(3, 2, buffer);
textManager.writeScript(4,10,0);
Robot.waitContinue(BUTTON_LEFT);
Robot.waitContinue(BUTTON_RIGHT);
textManager.showPicture("kt1.bmp", 0, 0);
}
void loop(){
// do nothing here
}
我們將依序介紹 Arduino 官方機器人的各個範例程式碼以及執行的影片。本範例是 HelloUser,請先下載 Arduino 1.0.5 或之後的版本就可以在 Examples / Robot control / explore 中找到 R11_HelloUser 這個範例。直接安裝到 Arduino 官方機器人上層的 Robot Control 板即可執行(下層叫做 Robot Motor Board)。
以下是 HelloUser 的程式碼,程式都在setup() 中。您可由影片中看到機器人上的彩色螢幕(好豪華...)載入幾張圖片(圖片都是放在 micro SD卡中),播放音效檔(menu.sqm)。使用SD卡就不用太擔心容量的問題了。
接著機器人會請您使用按鈕輸入名字(本影片為CAVE)之後會顯示一些打招呼語。先來看影片吧
[youtube=http://www.youtube.com/edit?o=U&video_id=jq-zRCIKDBY]
還記得我們有提過 Arduino官方機器人的韓式庫中做好了很多高階方法嗎?以下程式碼中的有一個textManager物件,它的writeScript(),showPicture() 與 input() 方法就是現成的語法可以用。您可以自己定義喜歡的語法加入 library 中就可以啦。
我們有將重要的地方改成中文標記
----------------------------------------------------------------
#include <ArduinoRobot.h>
#include <utility/RobotTextManager.h>
char buffer[20];//用來儲存使用者輸入的名稱
void setup(){
//necessary initialization sequence
Robot.begin();
Robot.beginTFT();
Robot.beginSpeaker(32000);
Robot.beginSD();
//從SD卡中顯示 logo圖檔
Robot.displayLogos();
//播放音樂檔
Robot.playFile("menu.sqm");
// 清除螢幕
Robot.clearScreen();
// 以 script 的概念播放圖檔與文字。之所以稱為 script 是因為這些是一連串儲存於機器人記憶體的文字
//Script 6
textManager.writeScript(5, 4, 0);
textManager.writeScript(9, 10, 0);
Robot.waitContinue();
delay(500);
Robot.clearScreen();
//Script 7
textManager.writeScript(6, 4, 0);
textManager.writeScript(9, 10, 0);
Robot.waitContinue();
delay(500);
Robot.clearScreen();
//Script 8
// this function enables sound and images at once
textManager.showPicture("init2.bmp", 0, 0);
textManager.writeScript(7, 2, 0);
textManager.writeScript(9, 7, 0);
Robot.waitContinue();
delay(500);
Robot.clearScreen();
//Script 9
textManager.showPicture("init3.bmp", 0, 0);
textManager.writeScript(8, 2, 0);
textManager.writeScript(9, 7, 0);
Robot.waitContinue();
delay(500);
Robot.clearScreen();
//Script 11
textManager.writeScript(10, 4, 0);
textManager.writeScript(9, 10, 0);
Robot.waitContinue();
delay(500);
Robot.clearScreen();
//Input screen
textManager.writeScript(0, 1, 1);
textManager.input(3, 1, USERNAME);
textManager.writeScript(1, 5, 1);
textManager.input(7, 1, ROBOTNAME);
delay(1000);
Robot.clearScreen();
//last screen
textManager.showPicture("init4.bmp", 0, 0);
textManager.writeText(1, 2, "Hello");
Robot.userNameRead(buffer);
textManager.writeText(3, 2, buffer);
textManager.writeScript(4,10,0);
Robot.waitContinue(BUTTON_LEFT);
Robot.waitContinue(BUTTON_RIGHT);
textManager.showPicture("kt1.bmp", 0, 0);
}
void loop(){
// do nothing here
}
我們將依序介紹 Arduino 官方機器人的各個範例程式碼以及執行的影片。本範例是 HelloUser,請先下載 Arduino 1.0.5 或之後的版本就可以在 Examples / Robot control / explore 中找到 R11_HelloUser 這個範例。直接安裝到 Arduino 官方機器人上層的 Robot Control 板即可執行(下層叫做 Robot Motor Board)。
以下是 HelloUser 的程式碼,程式都在setup() 中。您可由影片中看到機器人上的彩色螢幕(好豪華...)載入幾張圖片(圖片都是放在 micro SD卡中),播放音效檔(menu.sqm)。使用SD卡就不用太擔心容量的問題了。
接著機器人會請您使用按鈕輸入名字(本影片為CAVE)之後會顯示一些打招呼語。先來看影片吧
[youtube=http://www.youtube.com/edit?o=U&video_id=jq-zRCIKDBY]
還記得我們有提過 Arduino官方機器人的韓式庫中做好了很多高階方法嗎?以下程式碼中的有一個textManager物件,它的writeScript(),showPicture() 與 input() 方法就是現成的語法可以用。您可以自己定義喜歡的語法加入 library 中就可以啦。
我們有將重要的地方改成中文標記
----------------------------------------------------------------
#include <ArduinoRobot.h>
#include <utility/RobotTextManager.h>
char buffer[20];//用來儲存使用者輸入的名稱
void setup(){
//necessary initialization sequence
Robot.begin();
Robot.beginTFT();
Robot.beginSpeaker(32000);
Robot.beginSD();
//從SD卡中顯示 logo圖檔
Robot.displayLogos();
//播放音樂檔
Robot.playFile("menu.sqm");
// 清除螢幕
Robot.clearScreen();
// 以 script 的概念播放圖檔與文字。之所以稱為 script 是因為這些是一連串儲存於機器人記憶體的文字
//Script 6
textManager.writeScript(5, 4, 0);
textManager.writeScript(9, 10, 0);
Robot.waitContinue();
delay(500);
Robot.clearScreen();
//Script 7
textManager.writeScript(6, 4, 0);
textManager.writeScript(9, 10, 0);
Robot.waitContinue();
delay(500);
Robot.clearScreen();
//Script 8
// this function enables sound and images at once
textManager.showPicture("init2.bmp", 0, 0);
textManager.writeScript(7, 2, 0);
textManager.writeScript(9, 7, 0);
Robot.waitContinue();
delay(500);
Robot.clearScreen();
//Script 9
textManager.showPicture("init3.bmp", 0, 0);
textManager.writeScript(8, 2, 0);
textManager.writeScript(9, 7, 0);
Robot.waitContinue();
delay(500);
Robot.clearScreen();
//Script 11
textManager.writeScript(10, 4, 0);
textManager.writeScript(9, 10, 0);
Robot.waitContinue();
delay(500);
Robot.clearScreen();
//Input screen
textManager.writeScript(0, 1, 1);
textManager.input(3, 1, USERNAME);
textManager.writeScript(1, 5, 1);
textManager.input(7, 1, ROBOTNAME);
delay(1000);
Robot.clearScreen();
//last screen
textManager.showPicture("init4.bmp", 0, 0);
textManager.writeText(1, 2, "Hello");
Robot.userNameRead(buffer);
textManager.writeText(3, 2, buffer);
textManager.writeScript(4,10,0);
Robot.waitContinue(BUTTON_LEFT);
Robot.waitContinue(BUTTON_RIGHT);
textManager.showPicture("kt1.bmp", 0, 0);
}
void loop(){
// do nothing here
}
留言 💬 (0)
還沒有留言,來當第一個。